Tonight's dinner will be smothered chicken with popovers. The monkey bread will have to wait until tomorrow! The recipe for smothered chicken calls for a whole frying chicken cut into eight pieces.
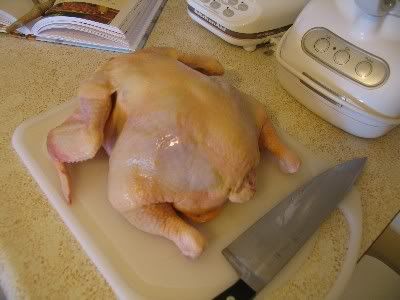
To cut up a whole chicken:
1. Place the chicken, breast side down, on a nonporous work surface (not wood). Using a very sharp knife, cut through the backbone along the spinal column.
2. Turn the chicken over and break both sides of the breastbone by pushing down on it with the hell of your hand. Firmly flatten the chicken as much as possible.
3. Wiggle the wing joint at the shoulder, poking around with the tip of your knife until you feel the connecting tissue.
4. Cut through to remove the wing. Repeat with the other wing.
5. Wiggle the leg back and forth to see where it connects to the body. Pull down to help detect the connecting joint; when you find the socket, cut through it. Repeat with the other leg.
6. Cut each thigh from the drumstick at the joint.
7. Cut away the side of the breast, still attached to the back, severing the tiny bones (backbone can be used for making stock).
8. Cut the breast in half, starting just above the cartilage and probing with your knife to feel where the tissue gives way. Make the cut a little off center, where the bones are thin. The chicken is now in eight pieces, ready to be cooked.
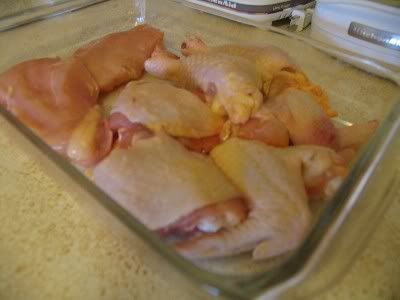
Of course the chicken was stuffed with nasty bits (okay okay, good stuff!) in a bag. I felt a wee bit guilty throwing 'em away, so I sauteed them plain for a few minutes until no longer colored for my minikitty. Oh man I sure spoil her! It smelled very yummy while cooking up. mmmm...yech
I'm about to go to Wildberries Market (they have a better selection of organic baking chocolate than the co-op! [edit- wrooong!]) and get ingredients for monkey bread. I've been wanting to make that for the longest time, but I didn't have a tube pan. I just bought one off eBay and it arrived a few days ago. Horray!
I also bought a popover pan and I just have to make some really, really soon! Popovers were my first baking success when I was a lassie, and for a long while I'd make them almost every weekend. I recently bought a cookbook called Lost Recipes - meals to share with friends and family by Marion Cunningham only because when I pulled it off the shelf and opened it to a random page, there before me was a recipe for popovers!! If that wasn't a sign to buy it, I don't know what that was ;) the book is an absolute delight. It's all about the values of bringing family and friends back to the dinner table and being in charge of your food (is: using fresh unadultered ingredients)
And I promise you that with the baking of monkey bread and popovers, I will create cooking vLogs about (showing off) the organic sustainable ingredients. Especially Strauss Family Farm organic milk, because I am beyond thrilled to have discovered them! And I will show you just exactly why.
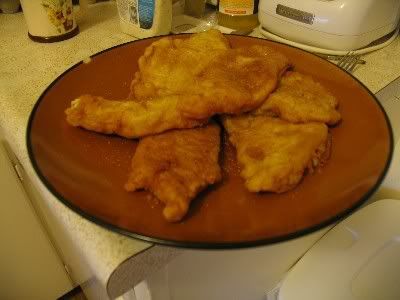
Jesse went fishing the other day and brought home three black rock fish and one big awesome ling cod. Last night we fried up a bunch of filets and had his sister over for fish & chips.
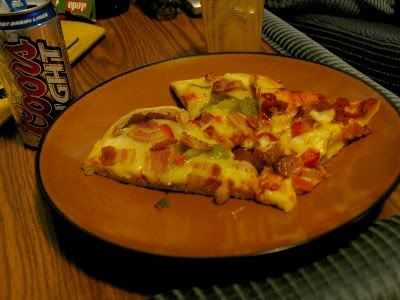
Last night, Jesse's sister & bro-in-law came over for dinner. The kitchen has been dealing with a number of messy explosions from my culinary adventures (!!), so I decided to go with a good, easy, somewhat mess-free meal.
Pizza made by yours truly (and its the best I've made yet!!): mozzarella from Humboldt Creamery, organic Californian red and green bell peppers (one each) roasted in the broiler, garlic paste, and bacon from the co-op.
Man, bacon's been my favorite food-item as of late. The fat is the best part, man! I used to cringe at Emeril's pork fat rocks 'philosophy' but there ain't anything bout it to cringe at! Except Emeril himself.. Bam! But yeah, the best thing is cooking bacon and then cook veggies in the drippings. Oh good lord!
I used this recipe for the pizza dough. It reminded me a lot of foccacia bread, I would say..except thinner and more....pizza-y!!! I used a pizza stone, which was pre-heated in an 450-475 degrees oven. The stone greatly contributed to the brickoven style (my favorite!) of my pies. Ace also taught me a great technique that worked super well : ) Onto the recipe!
3/4 cup warm water
1 envelope active dry yeast
2+ cups all-purpose flour
1 tsp sugar
3/4 tsp salt
3 tbsp olive oil
Combine water and yeast in small bowl (remember my emphasis on yeast & temperature). Let stand until foams, about five minutes.
Mix 2 cups flour, sugar, and salt in processor (by hand [slowly add yeast water as to avoid a mess!], or in a stand mixer). Add yeast mixture and 3 tbsp oil, process until dough forms a sticky ball. Transfer to lightly floured work surface. Knead dough until smooth and no longer sticks to your hands, adding more flour by tablespoonfuls if still very sticky.
Transfer to large bowl lightly coated with olive oil and turn dough to coat with oil. Cover bowl with kitchen towel (not terrycloth) and let dough rise in a warm area (I turned the oven to 200 degrees and sat the bowl on/besides it) until doubled in volume, about an hour. Punch down dough.
Roll out dough, starting in center, working outward toward edges but not over them.
Bake at 450 degrees, 475 degrees with toppings.
450 degrees, 475 with toppings huh?? Now here's where I'll tell you the wonderful technique Ace taught me for home bakers :)
Parbaking. He claims it's a must for pizza at home!
So I used a pizza stone. It was preheated for a good while in the oven after using the broiler to roast the bell peppers. Got all nice and hot! I sprinkled polenta (coarse ground cornmeal) on the stone before transferring the dough. On went the dough, and it was baked 'naked' without any toppings until it was about 3/4th way done. Ideally, the bottom should be golden and the top should not be 'streched' or cracked. At this point, put the toppings on and finish it off for another couple minutes!
Funny, while I was doing my thing in the kitchen, I was getting skeptical looks and asked like, twice-- are you sure you know what you're doing??? G'dang it, people. Y'all better learn to shut it or stay out of the kitchen ;) Things like that said to me makes me maaddd. So I didn't do the second pie, which wasn't parbaked.
But that was great though because then I could taste both ways and compare. The latter pie was great too-only two differences.. it had tomato sauce while I used garlic paste (most awesome spicy-ness, I'm telling ya!) and it wasn't parbaked, while mine was. Parbaking did make a difference! My pie had the loveliest golden bottom, the interior was cooked through, and it was strong enough to hold the cheese &toppings without sagging. Whereas the one that wasn't parbaked was baked well around the edges, but a few inches in the center sagged. Imagine two circles, big with smaller one in the center. The whole center- sag while the outer part- crisp. Thaat ; ) Wasn't bad, though! Can't go wrong with the dough..but it's a matter of preference, and I like brickoven style!
Topping I did: Prepare everything while the dough is rising. These are mentioned in the order they go on the pizza (bacon&peppers interchangeable). I used almost a whole monster-sized head of garlic (paper skin removed, of course) with a large pinch of salt. Combine the two in a food processor and let it sit for a few minutes to soften. Blend until it's paste-like (please tell me if you got another way to do this! I'd like to know :) ). Use the potato/veggie slicer on the side of a box grater (this is a quick way Jesse sliced the moz into uniform cheese slices. Grate or use a knife as you wish.) and slice a pound of mozzarella (Jesse wants to make sure I tell y'all a pound wasn't enough for us!). Store it, covered, in the refrigerator until ready for use (everything else can be left out). Roast one of each-- red and green bell peppers-- in a broiler, and flip the peppers every time the skin is blackened all the way until the entire pepper is blackened. Remove from broiler; turn the oven to the appropriate heat. Once cooled enough to touch, peel the blackened skin. This is really easy and can be done with the hands. Slice in half (might be liquid waiting to pour out!); remove the stem and scrape out the seeds and ribs with a knife. Slice into slightly thicker-than-matchsticks and put aside. Add chopped bacon to a warm nonstick skillet over medium heat and cook, stirring occasionally, until desired crispiness. Remove and drain on paper towels.
1 1/4 cups all-purpose flour
1/2 tsp baking soda
1/4 tsp salt
1/2 cup butter, room temperature
3/4 cup firmly packed brown sugar
1/2 tsp vanilla
1 large egg
6 ounces coarsely chopped semisweet chocolate
ice cream, softened
Sift together flour, baking soda, and salt.
Beat butter, sugar, and vanilla in mixer on medium until well vlended. Beat in egg, mixing well (tip: break egg into bowl and beat it first before adding). Add flour mixture and beat slowly to incorporate, then beat to blend well. Stir in chocolate chunks.
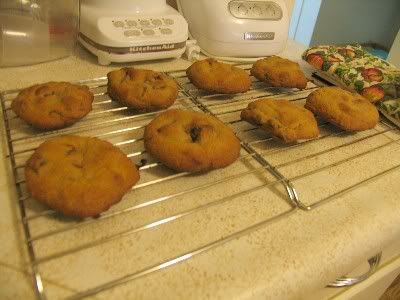
Drop batter in 2 tbsp portions 2-inch apart on baking sheets. Bake on middle rack of 400 degrees oven until edges are brown, but 1-inch in center is still soft and pale, 6-7 minutes. If using two pans, switch halfway through.
Let cool on pan about five minutes then transfer to wire rack and cool completely.
Soften ice cream and spread on cooled cookie, wrap and freeze.
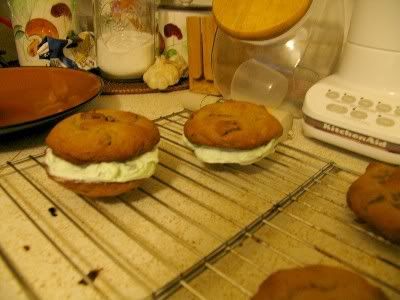
lolol next picture-- action shot of what happened just moments after this
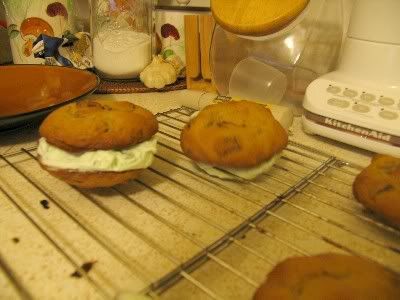
don't let your ice cream sit out too long!
this recipe makes only about eight cookies, good for 4 huge sandwiches :)
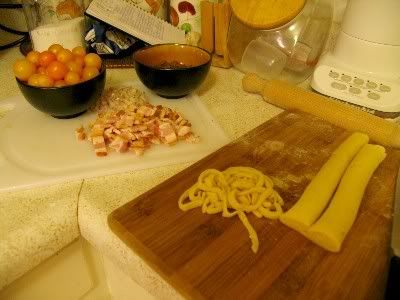 'scrolled up' garlic pasta being cut into noodles.
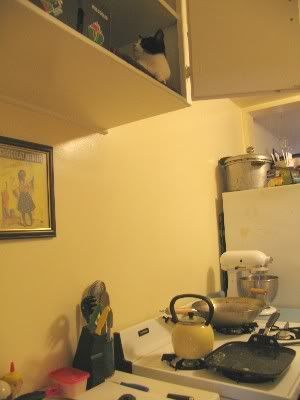
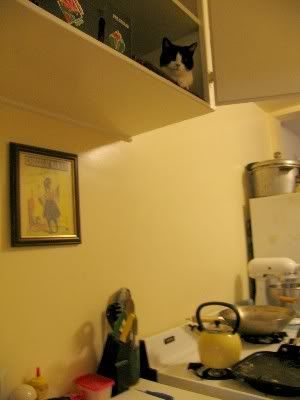
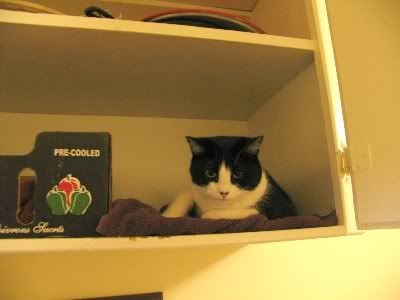
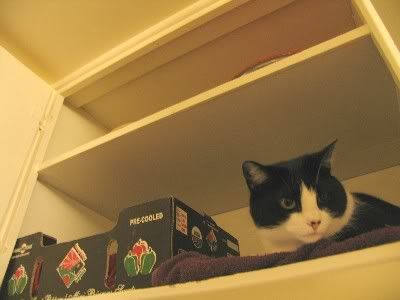
Minikitty (Relish) is such a bad girl! She lives her life for getting into 'bad' places around the house that she's not supposed to be in. Man, I'm telling you, she loves it! So I made her a bed in the kitchen in one of the no-no spots (food related, thus it can go in this blog!!) Isn't she adorable??
'scrolled up' garlic pasta being cut into noodles.
Minikitty (Relish) is such a bad girl! She lives her life for getting into 'bad' places around the house that she's not supposed to be in. Man, I'm telling you, she loves it! So I made her a bed in the kitchen in one of the no-no spots (food related, thus it can go in this blog!!) Isn't she adorable??
 On to the food.....
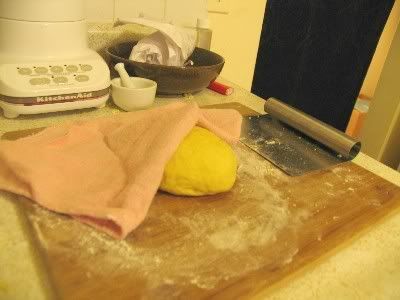 Thank godddd for the pastry scraper, I'm telling ya! The juices from the garlic paste made the dough much more stickier, so with extra flour and some good scrapin', I was able to get the most out of my dough. If you have a pastry scraper, use it!!!!
bacon, beef, tomatoes, shallot, chicken stock (not pictured) accompanied the garlic pasta in a lovely, hearty sauce.
Thank godddd for the pastry scraper, I'm telling ya! The juices from the garlic paste made the dough much more stickier, so with extra flour and some good scrapin', I was able to get the most out of my dough. If you have a pastry scraper, use it!!!!
bacon, beef, tomatoes, shallot, chicken stock (not pictured) accompanied the garlic pasta in a lovely, hearty sauce.
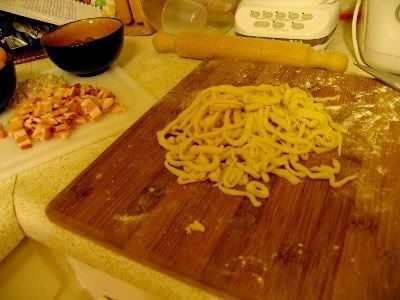 noodles for two!
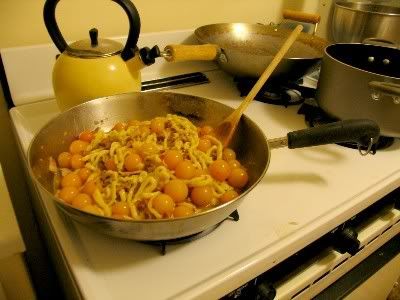 So the noodles were cooked in a large pot of boiling salted water just until barely al dente (has a bite), about seven minutes (the recipe for homemade pasta I followed directed to boil the pasta for ten minutes). I drained the pasta, and then tossed it in the sauce for a couple minutes until juices were absorbed and the pasta was al dente. When making this, finish the sauce, or at least be in the process of reductiton before the pasta is added to the sauce.
The sauce was as follows: Cook ground beef in a light touch of oil. I was using leftover ground beef, so I only had a quarter pound (small hamburger size)..Increase the amount, or subsitute. I'd say chicken would be great! Remove the beef from the pan once browned and no pink is visible, and add the chopped bacon. Cook it over medium heat until the yummy bacon fat is well distributed in the pan and add the tomatoes (cherry highly recommended). Stir, coating the tomatoes in the juices and add the coarsely chopped shallots. Stir for about a minute, softening the shallots slightly, then return the beef to the pan and add about half a cup of chicken stock (I made my own, but low sodium chicken broth can be bought at most any stores). Let it come to a boil, reduce the heat and simmer until reduced to 1/4 cups.
Add the drained garlic pasta to the pan and cook for a couple minutes until juices are absorbed. My dumb self didn't get fresh herbs when I went to the co-op earlier, and I didn't feel like using dried. So go buy some fresh basil or something! Tear the basil into ribbons and stir into the garlic pasta just before removing the pan from the heat to serve. Spoon the pasta onto plates. With a hand-held grater, grate Parmigiano Regiano over the pasta and serve with a small sprig of basil in the center ;) I served fresh baguettes with the pasta.

Yumm-o!
Hmm. Maybe photobucket is far too slow for all my vids and my pictures. My latest blog/vLog crashed my computer just now! And there's still that camping entry where the pictures aren't loading >: (
I don't like youtube so much, mainly because I want to keep my videos and comments in one place. Maybe google video? But I'd have the same issue over there! What do you guys use to host your videos?
I'll fix this...laterr!! Sorry if it's slow on your computer. I hope it's just mine!!
I've allowed anonymous comments, because I know not y'all have a blogger account! Cheers.
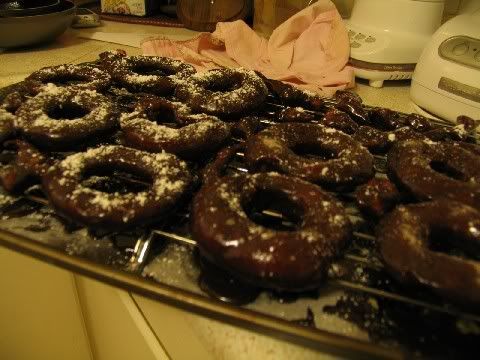
For a week now, I've had cravings for doughnuts where it got to the point of driving me insane, so I just had to, had to find a recipe! I used one from Gourmet and it turned out alright. I'd like a fluffier doughnut, but I suppose I should've fried 'em for less time. Well, when you make 'em, you can fry 'em shorter and make doughnuts sooo yummy you'll be wanting to make 'em everyday, because I know I want to make some more!
Dough:
2 1/2 tsp active dry yeast
2 tbsp warm water (105-115 degrees)
3 1/4 cup all-purpose flour
1 cup whole milk at room temperature
3 large egg yolk
1/2 stick unsalted butter
2 tbsp sugar
1 1/2 tsp salt
1/2 tsp cinnamon
Stir yeast and warm water in bowl until yeast is dissolved. Let stand until foamy, about 5 minutes. Discard if not foamy.
Mix flour, milk, butter, yolks, sugar, salt, cinnamon, and yeast mixture in a mixer at low speed until a soft dough forms. Increase speed to medium-high and mix 3 minutes. Scrape all dough down to center of bowl and sprinkle with flour.
Cover dough with a clean kitchen towel (not terrycloth) and let dough rise in a draft-free place at warm room temperature until doubled in bulk, 1 1/2 - 2 hours. (I forgot to mention in the vLog- TIP: turn the oven on to 200 degrees and put the bowl either on top or besides it. But be careful- this can speed up the rising so keep an eye on it)
Turn dough out onto lightly floured surface (If you're using a counter top like me, spray it down with a cleaner and then wipe it very well with a wet kitchen towel. Clean it with water repeatedly and dry before flouring!) and roll out with lightly floured pin into 12-inch round, 1/2 inch thick (watch it-I didn't and rolled too thin! That made some skinny doughnuts heh). Cut out as many rounds as possible with 3-inch cutter then cut hole in center with 1-inch cutter. Transfer to lightly floured large baking sheet and cover with clean kitchen towel. Let rise in warm room temperature until doubled in size, about thirty minutes.
Heat 2 1/2-inch oil in deep 4-qt heavy pot until 350 degrees (I used a wok and poured in a whole bottle of canola oil). Fry doughnuts 2 at a time (or as many as you can without crowding donuts), turning once until puffed and golden brown, about two minutes total (OR A LOT SHORTER, MAN). Transfer to paper towel to drain and return oil to 350 degrees between batches <-- important
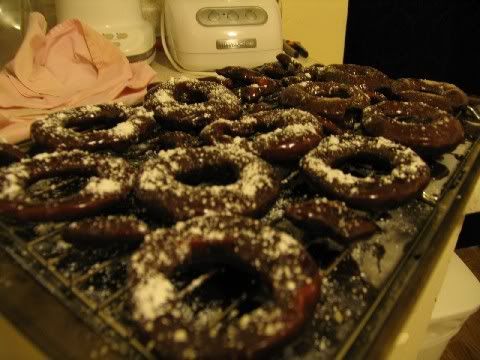
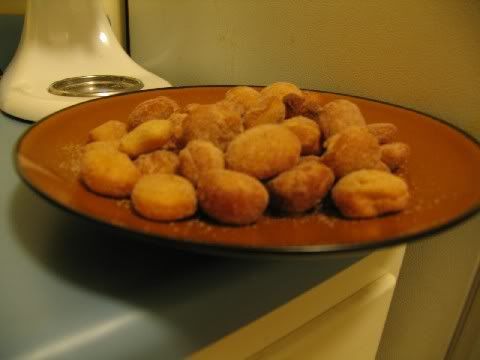
Glaze: if I remember correctly, I melted a stick of butter in a double boiler (bowl set over an inch of simmering-do not boil-water in saucepan) and threw in a 'bakers bar' of organic chocolate and stirred until melted, added a quarter cup of warmed milk. Remove the bowl from heat and stir in two cups of sifted confectioner's sugar. You're supposed to use light corn syrup too, but I didn't have any. Worked fine anyhow! You can use your own glaze if you wish. oohhh for the doughnut holes, I tossed them in a ziploc plastic bag that had 1 part cinnamon to two/three parts sugar
CHEERS.